
Welcome back to Day 28 of the 30 Days of n8n & Automation series here on whoisalfaz.me.
We have reached the final tier of automation.
Over the last 27 days, we have mastered text, data, images, and voice. We gave our AI Vision, Hands, Memory, and Speech.
But today, we conquer the medium that rules the internet: Video.
The Problem: Why Video Editing is a Trap
The Content Treadmill is Dead – Buildi a “Faceless” Video Factory with n8n If you are trying to build a personal brand or grow an agency, you have heard the advice: “You must post vertical video daily.”
TikTok, Instagram Reels, and YouTube Shorts are the only reliable way to get organic reach in 2026. But the production process is a prison.
To make a single 30-second “Faceless” video (the kind with a voiceover, stock footage, and captions), a human editor must:
- Write a Script: 30 minutes of creative drain.
- Record Voiceover: 20 minutes of recording and cleaning audio.
- Source Visuals: 1 hour of hunting for stock footage on Pexels.
- Edit & Caption: 2 hours in Premiere Pro or CapCut.
That is 4 hours of work for 30 seconds of content. This is unscalable.
The Solution: Programmatic Video
As an Automation Architect, I refuse to do manual labor that a machine can do better.
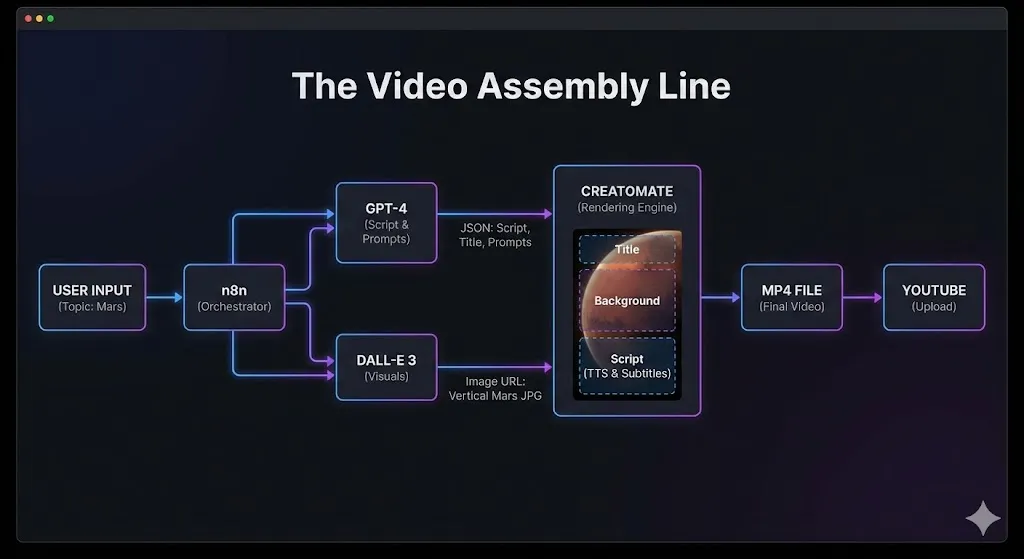
Today, we are going to build an Automated Video Factory. We will build a workflow where you simply feed it a text topic—like “3 Mind-Blowing Facts About Mars”—and the system will output a fully produced .mp4 file ready for upload.
This is not “AI Video” in the sense of Sora or Runway (which generate weird, morphing pixels). This is Programmatic Video: using code to assemble high-quality assets (images, text, audio) into a structured template.
It is reliable, brand-safe, and infinitely scalable.
The Tech Stack (The “Director’s Suite”)
To manipulate pixels with code, we need a specialized rendering engine. FFMPEG is too complex for rapid iteration, and tools like Canva lack a true API.
We will use the “Agency-Grade” Video Stack:
- n8n: The Director. It orchestrates the entire production line.
- OpenAI (GPT-4o): The Screenwriter. It writes the script and visual descriptions.
- OpenAI (DALL-E 3): The Art Department. It generates unique, copyright-free background visuals.
- Creatomate: The Rendering Engine.
- Why Creatomate? It is the industry standard for API-based video editing. It allows you to design a template in a web editor (like Canva), tag elements as “Dynamic,” and then update them via JSON. It has a robust free tier and integrates natively with n8n.
Prerequisite: Go to Creatomate.com and sign up for a free account.
Step 1: The Screenwriter (GPT-4 JSON Mode)
The biggest mistake beginners make is asking ChatGPT to “Write a script.” It returns a block of text with emojis and scene directions like “[Camera pans left]”. This breaks automation.
We need Structured Data. We need the AI to return a strictly formatted JSON object that separates the spoken words from the visual instructions.
- Trigger: Use a Manual Trigger (or a Form Trigger where you type the topic).
- Node: OpenAI Chat Model.
- Model:
gpt-4o(We need high intelligence to follow JSON schemas). - System Prompt:
You are an expert viral content scriptwriter for YouTube Shorts.
The user will provide a topic. You must generate a concise, 30-second script.
You must return ONLY a JSON object with this exact structure:
JSON
{
  "title": "A punchy 3-5 word title for the video overlay (e.g., 'The Mars Mystery')",
  "script": "The full spoken voiceover script. Keep it under 60 words. No scene directions.",
  "image_prompt": "A highly detailed, cinematic DALL-E 3 prompt for a background image that matches the topic. Aspect ratio 9:16. No text in the image.",
  "keywords": "comma, separated, tags, for, youtube"
}
The Logic:
By separating script and image_prompt, we can send them to different workers (TTS and DALL-E) simultaneously.
Test It:
Input: “The history of Bitcoin.”
Output:
JSON
{
  "title": "Bitcoin: The Digital Gold",
  "script": "In 2009, an anonymous creator named Satoshi Nakamoto released Bitcoin...",
  "image_prompt": "A golden digital coin glowing on a dark futuristic circuit board, cybernetic style, vertical composition...",
  "keywords": "bitcoin, crypto, finance, history"
}
Step 2: The Art Department (DALL-E 3)
A video needs visuals. We could use stock footage APIs (like Pexels), but they are often generic. Generative AI allows us to create unique, branded visuals every time.
- Node: OpenAI Image Generation.
- Resource: Image.
- Operation: Generate.
- Prompt: Click the expression gear and select
{{ $json.image_prompt }}from the previous GPT-4 node. - Size:
1024x1792.- Critical: This is the 9:16 vertical aspect ratio. If you generate a square image, it will look terrible in a Short.
- Quality: Standard (HD is slower and often unnecessary for mobile screens).
Output:
The node will return a Public URL (e.g., oaidalleapiprod...).
Note: This URL expires after an hour. This is fine because we will render the video immediately.
Step 3: The Template (Creatomate Setup)
This is the most “technical” part of today’s build, but also the most powerful. We need to tell the rendering engine where to put our assets.
- Log in to Creatomate and go to Templates.
- Click New and choose a “Shorts/Reels” preset. (Pick one that has a background video/image, a big title, and subtitles).
- The “Dynamic” Tagging:This is the magic. We need to expose specific elements to the API.
- Background: Click the background image element. In the right property panel, find the name. Rename it to
Background. Toggle “Dynamic” to ON. - Title: Click the big text overlay. Rename it to
Title. Toggle “Dynamic” to ON. - Subtitles: Click the subtitle element (or add one). Rename it to
Script. Toggle “Dynamic” to ON.
- Background: Click the background image element. In the right property panel, find the name. Rename it to
What just happened?
You created an API endpoint that accepts JSON like { "Background": "url...", "Title": "Text..." }.
Creatomate will take that JSON and auto-adjust the video duration, subtitle timing, and animations to fit.
Save your template. Copy the Template ID and your API Key.
Step 4: The Director (n8n Orchestration)
Back in n8n, we bring it all together.
- Node: Search for Creatomate.
- Credential: Paste your API Key.
- Operation: Render Video.
- Template ID: Paste the ID from Step 3.
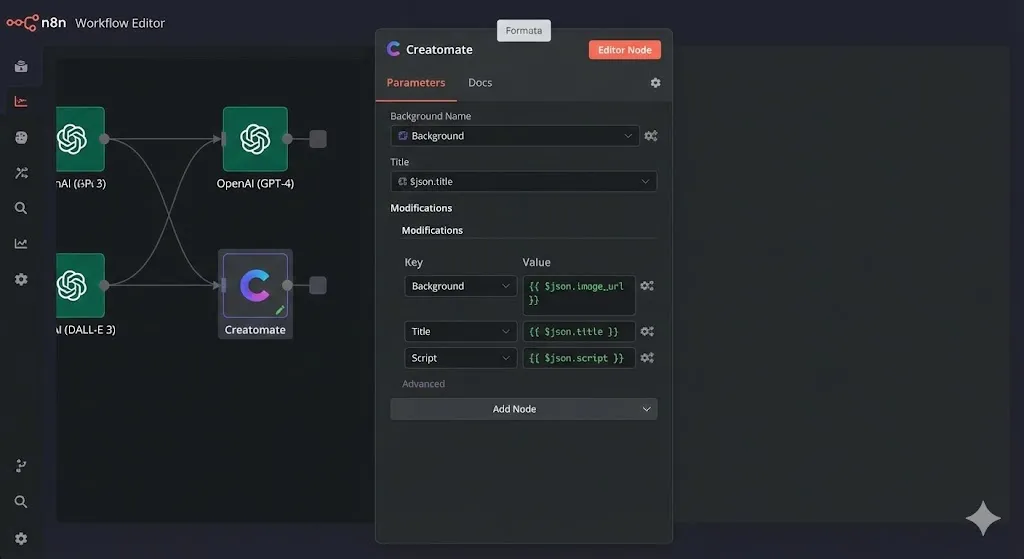
- Modifications:This is where we map our AI data to the video template. Click “Add Option” for each element.Key (Template Element)Value (n8n Expression)
Background{{ $json.image_url }}(From DALL-E)Title{{ $json.title }}(From GPT-4)Script{{ $json.script }}(From GPT-4)
The “Voice” Secret
You might be wondering: “Where is the audio file?”
Creatomate has a built-in Text-to-Speech engine. By passing the text into the Script field (if your template is set up for it), Creatomate will automatically:
- Generate the voiceover (using Azure/Google voices).
- Time the video to match the voice length.
- Generate the subtitles (SRT) perfectly synced to the voice.
Advanced Option: If you want to use ElevenLabs for better voices, you would generate the audio in n8n first, upload it to a server, and pass the Audio URL to Creatomate. For today, we stick to the internal TTS for simplicity.
Step 5: Distribution (Upload to YouTube)
A video sitting on a server generates $0 revenue. We need to ship it.
The Creatomate node returns a JSON object containing a url ending in .mp4.
- Download the File:
- Use an HTTP Request node.
- Method: GET.
- URL:
{{ $json.url }}(from Creatomate). - Response Format: File (Binary).
- Upload to YouTube:
- Use the Google YouTube node.
- Operation: Upload Video.
- Binary Data: Connect to the HTTP node.
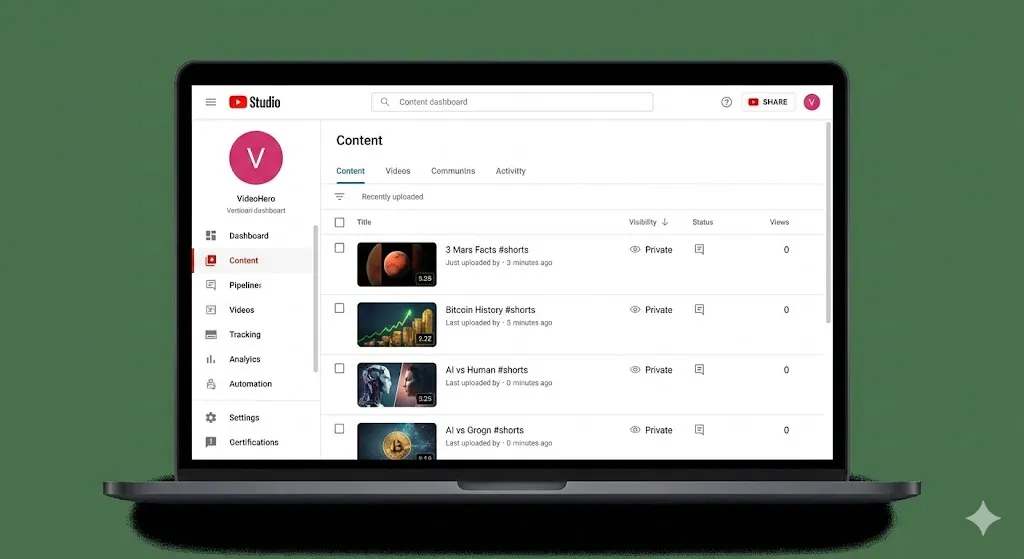
- Title:
{{ $json.title }} #shorts(The#shortstag is crucial for algorithm placement). - Description:
{{ $json.script }}Generated by AI Automation. #ai #automation - Privacy Status:Private.
- Alfaz’s Advice: Always set automated content to “Private” first. You want to check for hallucinations or bad visuals before unleashing it on the world.
Advanced Strategies: Making It “Agency-Grade”
The workflow above creates a solid “MVP” video. But to sell this to clients, you need polish.
1. Multi-Scene Videos
A single static image for 30 seconds is boring.
- Fix: Ask GPT-4 to generate three image prompts (
image_1,image_2,image_3). - Creatomate: Set up your template with 3 scenes. Map the images sequentially. This increases retention massively.
2. Background Music
A video without music feels empty.
- Fix: In Creatomate, add an “Audio” element set to “Loop.” Upload a royalty-free lo-fi track. This ensures every generated video has a vibe.
3. Brand Watermarking
- Fix: Add a logo image in the corner of your Creatomate template. Now every video is branded automatically, whether it’s for your agency or a client.
Use Cases: The “Content-as-a-Service” Model
This workflow is a goldmine for agencies. You stop selling “hours of editing” and start selling “Assets.”
- Real Estate Agents:
- Input: Property Address + 3 Zillow Photos.
- Output: A 15-second “Just Listed” Reel with upbeat music and overlay text.
- Price: $500/mo for unlimited automated videos.
- E-Commerce Brands:
- Input: Product Name + Shopify Image.
- Output: A “Product Spotlight” video for TikTok Ads.
- Educational Channels:
- Input: “History Fact of the Day.”
- Output: Infinite educational shorts for a “Did You Know?” channel. Monetize via YouTube Partner Program.
Conclusion
You have just built a machine that converts Ideas into Assets.
This workflow changes the economics of content creation. It decouples “Output” from “Time.” You can now test 10 different video concepts for the cost (and time) of one.
What’s Next?
We have built incredible separate systems: Research, Support, Content, Video.
But they are all disconnected. Your Voice Bot doesn’t talk to your Video Bot.
Tomorrow, on Day 29, we are going to build the “Master Orchestrator.” We will combine everything we have learned into a single “AI Operating System” (AIOS) that manages your entire digital life from one dashboard.
See you in the workflow editor.